In this article, we propose an architecture to implement a scalable solution to Deep Linking on iOS using an underlying Flow Controller-based architecture, all powered by a state machine and the Futures & Promises paradigm to keep the code more readable.
At Just Eat, we use a dedicated component named NavigationEngine that is domain-specific to the Just Eat apps and their use cases. A demo project named NavigationEngineDemo that includes the NavigationEngine architecture (stripped of many details not necessary to showcase the solution) is available on GitHub.
Overview
Deep linking is one of the most underestimated problems to solve on mobile. A naïve explanation would say that given some sort of input, mobile apps can load a specific screen but it only has practical meaning when combined with Universal Links on iOS and App Links on Android. In such cases, the input is a URL that would load a web page on the companion website.
Let’s use an example from Just Eat: opening the URL https://www.just-eat.co.uk/area/ec4m-london on a web browser would load the list of restaurants in the UK London area for the postcode EC4M. Deep linking to the mobile apps using the same URL should give a similar experience to the user.
In reality, the problem is more complex than what it seems at first glance; non-tech people – and sometimes even developers – find it hard to grasp. Loading a web page in a browser is fundamentally different from implementing dedicated logic on mobile to show a UIViewController (iOS) or Activity (Android) to the user and populate it with information that will most likely be gathered from an API call.
The logic to perform deep linking starts with parsing the URL, understanding the intent, constructing the user journey, performing the navigation to the target screen passing the info all the way down, and ultimately loading any required data asynchronously from a remote API. On top of all this, it also has to consider the state of the app: the user might have previously left the app in a particular state and dedicated logic would be needed to deep link from the existing to the target screen. A scenario to consider is when the user is not logged in and therefore some sections of the app may not be available.
Deep linking can actually be triggered from a variety of sources:
- Safari web browser
- any app that allows tapping on a link (iMessage, Notes, etc.)
- any app that explicitly tries to open the app using custom URL schemes
- the app itself (to perform jumps between sections)
- TodayExtension
- shortcut items (Home Screen Quick Actions)
It should be evident that implementing a comprehensive and scalable solution that fully addresses deep linking is far from being trivial. It shouldn’t be an after-thought but rather be baked into the app architecture from the initial app design.
It should also be quite glaring what the main problem that needs to be solved first is: the app Navigation.
Navigation itself is not a problem with a single solution (if it was, the solution would have been provided by Apple/Google and developers would have simply stuck to it). A number of solutions were proposed over the years trying to make it simpler and generic to some degree – Router, Compass, XCoordinator to name just a few open-source components.
I proposed the concept of Flow Controllers in my article Flow Controllers on iOS for a better navigation control back in 2014 when the community had already (I believe) started shifting towards similar approaches. Articles such as Improve your iOS Architecture with FlowControllers (by Krzysztof Zabłocki), A Better MVC, Part 2: Fixing Encapsulation (by Dave DeLong), Flow Coordinators in iOS (by Dennis Walsh) got good traction, and even as recently as 2019, Navigation with Flow Controllers (by Majid Jabrayilov) was published.
To me, all the proposals share one main common denominator: flow controllers/coordinator and their API are necessarily domain-specific. Consider the following methods taken from one of the articles mentioned above referring to specific use cases:
func showLoginViewController() { ... }
func showSignupViewController() { ... }
func showPasswordViewController() { ... }
With the support of colleagues and friends, I tried proposing a generic and abstract solution but ultimately hit a wall. Attempts were proposed using enums to list the supported transitions (as XCoordinator shows in its README for instance) or relying on meta-programming dark magic in Objective-C (which is definitely the sign of a terrible design), neither of which satisfied me in terms of reusability and abstraction. I ultimately realized that it’s perfectly normal for such problem to be domain-specific and that we don’t necessarily have to find abstract solutions to all problems.
Terminology
For clarity on some of the terminology used in this article.
- Deep Linking: the ability to reach specific screens (via a flow) in the app either via a Deep Link or a Universal Link.
- Deep Link: URI with custom scheme (e.g.
just-eat://just-eat.co.uk/login,just-eat-dk://just-eat.co.uk/settings) containing the information to perform deep linking in the app. When it comes to deep links, the host is irrelevant but it’s good to keep it as part of the URL since it makes it easier to construct the URL usingURLComponentsand it keeps things more ‘standard’. - Universal Link: URI with http/https scheme (e.g.
https://just-eat.co.uk/login) containing the information to perform deep linking in the app. - Intent: the abstract intent of reaching a specific area of the app. E.g.
goToOrderDetails(OrderId). - State machine transition: transitions in the state machine allow navigating to a specific area in the app (state) from another one. If the app is in a state where the deep linking to a specific screen should not be allowed, the underlying state machine should not have the corresponding transition.
Solution
NavigationEngine is the iOS module (pod) used by the teams at Just Eat, that holds the isolated logic for navigation and deep linking. As mentioned above, the magic sauce includes the usage of:
- FlowControllers to handle the transitions between ViewControllers in a clear and pre-defined way.
- Stateful state machines to allow transitions according to the current application state. More information on FSM (Finite State Machine) here and on the library at The easiest State Machine in Swift.
- Promis to keep the code readable using Futures & Promises to help avoiding the Pyramid of doom. Sticking to such a paradigm is also a key aspect for the whole design since every API in the stack is async. More info on the library at The easiest Promises in Swift.
- a pretty heavy amount of 🧠
NavigationEngine maintains separation of concerns between URL Parsing, Navigation, and Deep Linking. Readers can inspect the code in the NavigationEngineDemo project that also includes unit tests with virtually 100% code coverage. Following is an overview of the class diagram of the entire architecture stack.
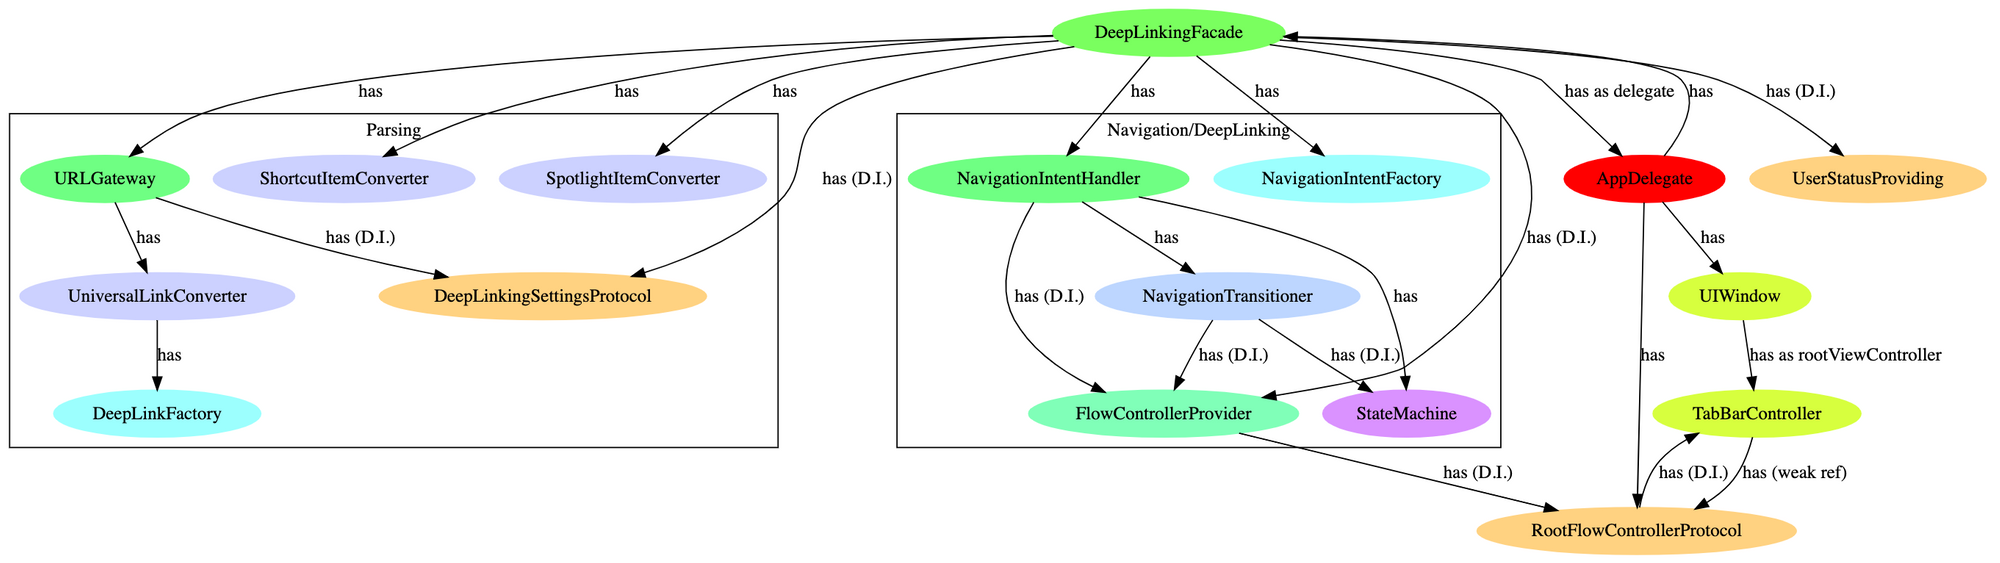
While the navigation is powered by a FlowController-based architecture, the deep linking logic is powered by NavigationIntentHandler and NavigationTransitioner (on top of the navigation stack).
Note the single entry point named DeepLinkingFacade exposes the following API to cover the various input/sources we mentioned earlier:
public func handleURL(_ url: URL) -> Future
public func openDeepLink(_ deepLink: DeepLink) -> Future
public func openShortcutItem(_ item: UIApplicationShortcutItem) -> Future
public func openSpotlightItem(_ userActivity: NSUserActivityProtocol) -> Future
Here are the sequence diagrams for each one. Refer to the demo project to inspect the code.


Navigation
As mentioned earlier, the important concept to grasp is that there is simply no single solution to Navigation. I’ve noticed that such a topic quickly raises discussions and each engineer has different, sometimes strong opinions. It’s more important to agree on a working solution that satisfies the given requirements rather than forcing personal preferences.
Our NavigationEngine relies on the following navigation rules (based on Flow Controllers):
- FlowControllers wire up the domain-specific logic for the navigation
- ViewControllers don’t allocate FlowControllers
- Only FlowControllers, AppDelegate and similar top-level objects can allocate ViewControllers
- FlowControllers are owned (retained) by the creators
- FlowControllers can have children FlowControllers and create a parent-child chain and can, therefore, be in a 1-to-many relationship
- FlowControllers in parent-child relationships communicate via delegation
- ViewControllers have weak references to FlowControllers
- ViewControllers are in a 1-to-1 relationship with FlowControllers
- All the FlowController domain-specific API must be future-based with
Futureas return type - Deep linking navigation should occur with no more than one animation (i.e. for long journeys, only the last step should be animated)
- Deep linking navigation that pops a stack should occur without animation
In the demo project, there are a number of *FlowControllerProtocols, each corresponding to a different section/domain of the hosting app. Examples such as RestaurantsFlowControllerProtocol amd OrdersFlowControllerProtocolare taken from the Just Eat app and each one has domain specific APIs, e.g:
func goToSearchAnimated(postcode: Postcode?, cuisine: Cuisine?, animated: Bool) -> Future
func goToOrder(orderId: OrderId, animated: Bool) -> Future
func goToRestaurant(restaurantId: RestaurantId) -> Future
func goToCheckout(animated: Bool) -> Future
Note that each one:
- accepts the
animatedparameter - returns
Futureso that flow sequence can be combined
Flow controllers should be combined sensibly to represent the app UI structure. In the case of Just Eat we have a RootFlowController as the root-level flow controller orchestrating the children. A FlowControllerProvider, used by the NavigationTransitioner, is instead the single entry point to access the entire tree of flow controllers.
NavigationTransitioner provides an API such as:
func goToLogin(animated: Bool) -> Future
func goFromHomeToSearch(postcode: Postcode?, cuisine: Cuisine?, animated: Bool) -> Future
This is responsible to keep the underlying state machine and what the app actually shows in sync. Note the goFromHomeToSearch method being verbose on purpose; it takes care of the specific transition from a given state (home).
One level up in the stack, NavigationIntentHandler is responsible for combining the actions available from the NavigationTransitioner starting from a given NavigationIntent and creating a complete deep linking journey. It also takes into account the current state of the app. For example, showing the history of the orders should be allowed only if the user is logged in, but it would also be advisable to prompt the user to log in in case he/she is not, and then resume the original action. Allowing so provides a superior user experience rather than simply aborting the flow (it’s what websites achieve by using the referring URL). Here is the implementation of the .goToOrderHistory intent in the NavigationIntentHandler:
case .goToOrderHistory:
    switch userStatusProvider.userStatus {
    case .loggedIn:
        return navigationTransitioner.goToRoot(animated: false).thenWithResult { _ -> Future in
            self.navigationTransitioner.goToOrderHistory(animated: true)
        }
    case .loggedOut:
        return navigationTransitioner.requestUserToLogin().then { future in
            switch future.state {
            case .result:
                return self.handleIntent(intent) // go recursive
            default:
                return Future.futureWithResolution(of: future)
            }
        }
}
Since in the design we make the entire API future-based, we can potentially interrupt the deep linking flow to prompt the user for details or simply gather missing information from a remote API. This is crucial and allows us to construct complex flows.
By design, all journeys start by resetting the state of the app by calling goToRoot. This vastly reduces the number of possible transitions to take care of as we will describe in more detail in the next section dedicated to the underlying state machine.
State Machine
As you might have realized by now, the proposed architecture makes use of an underlying Finite State Machine to keep track of the state of the app during a deep linking journey.
Here is a simplified version of the state machine configurations used in the Just Eat iOS apps.
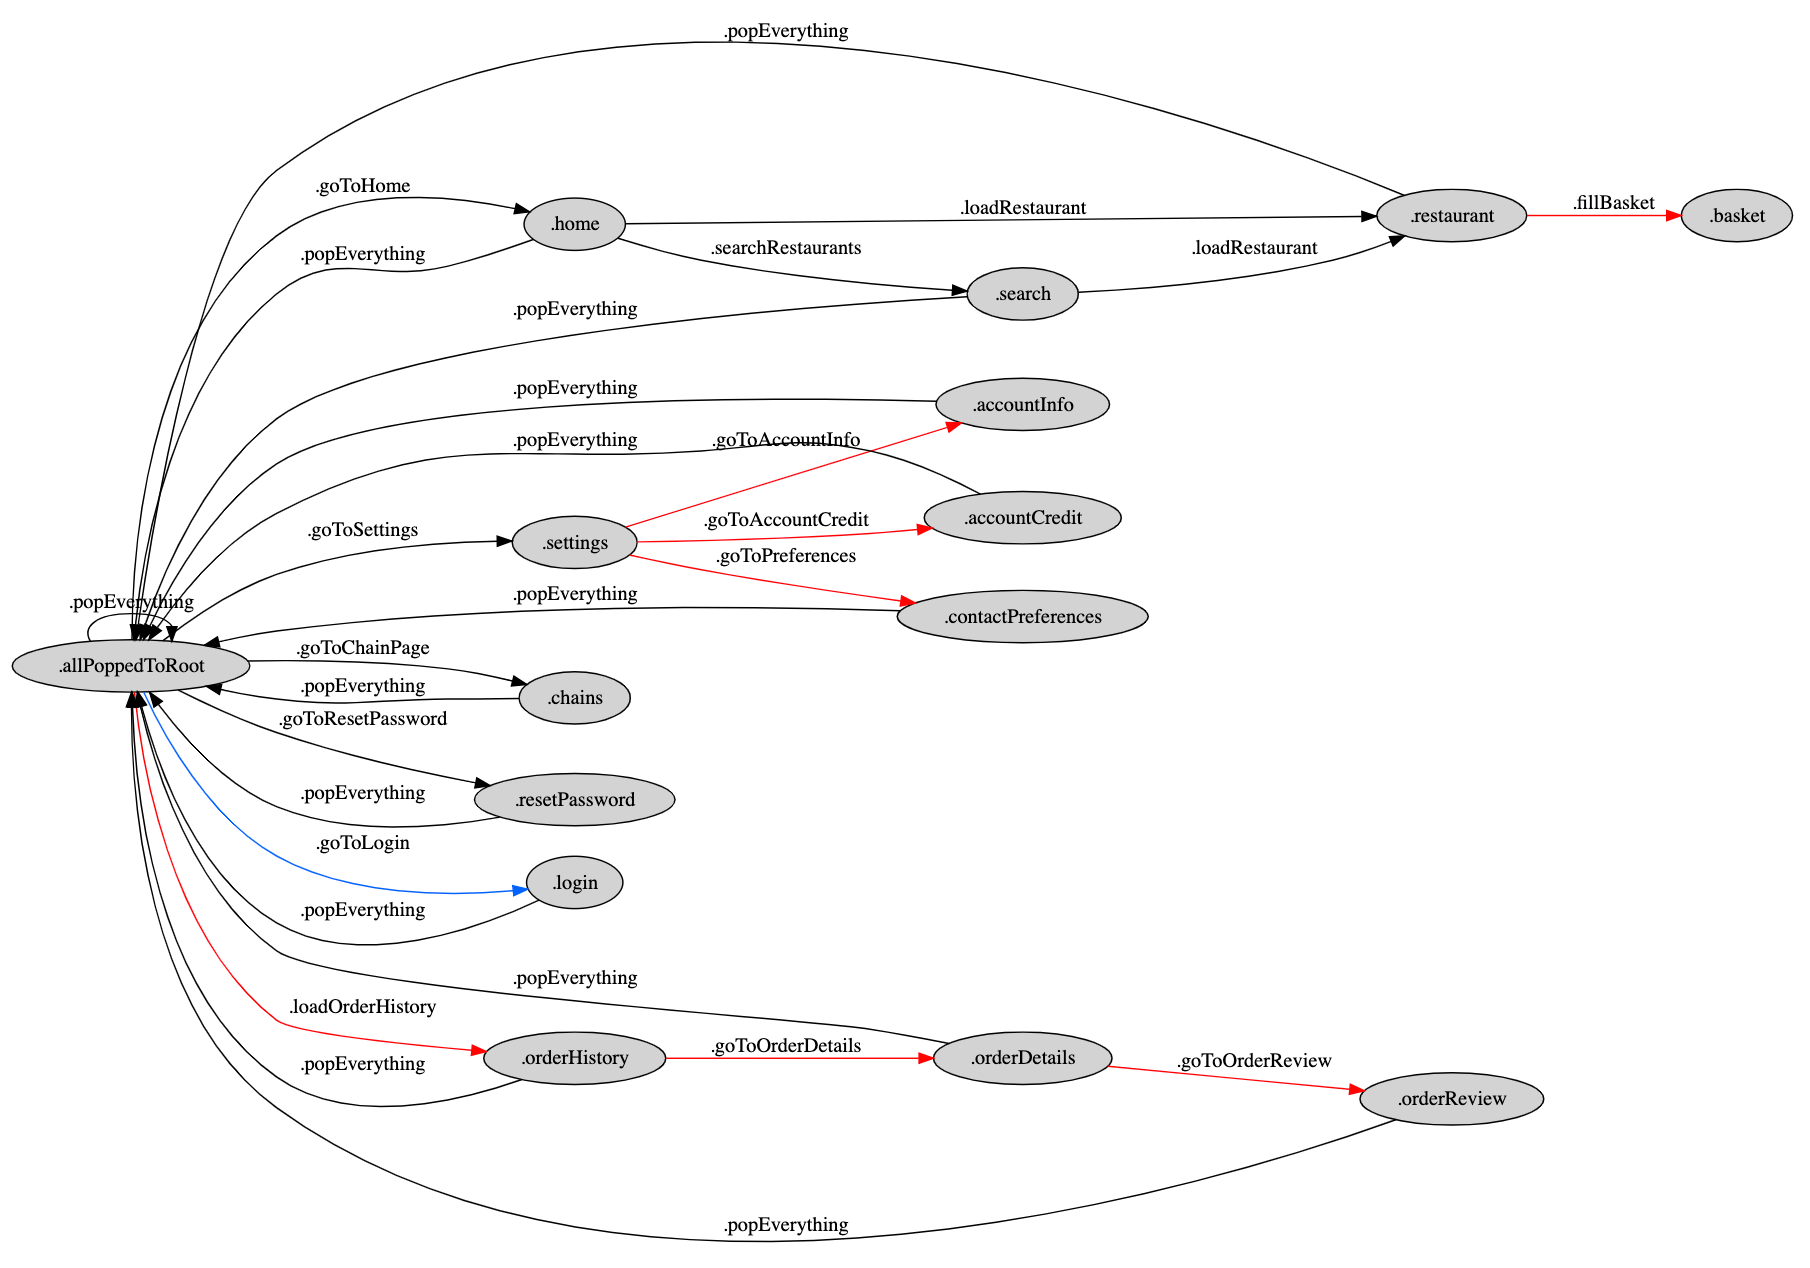
In the picture, the red arrows are transitions that are available for logged in users only, the blue ones are for logged out users only, while the black ones can always be performed.
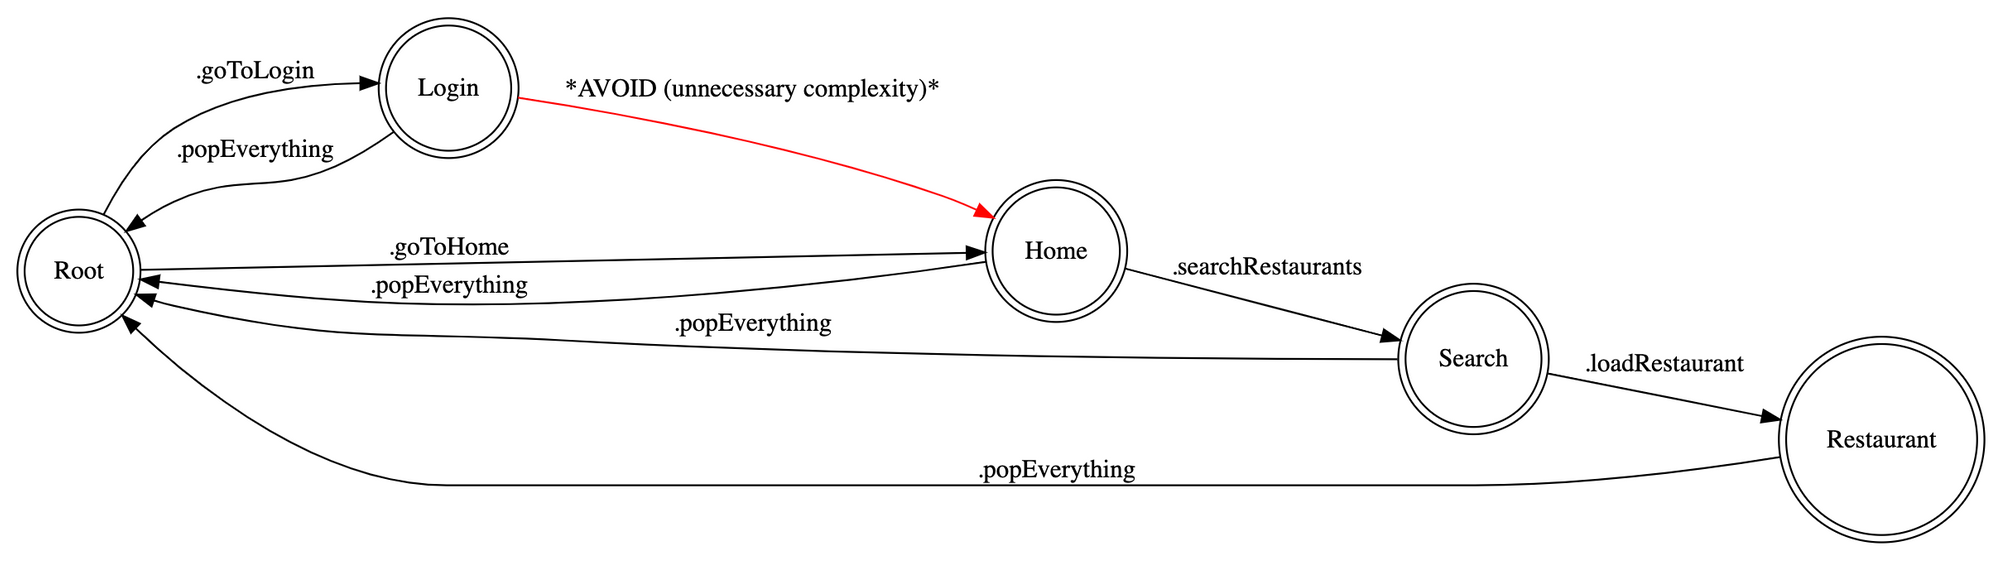
Note that every state should allow going back to the .allPoppedToRoot state so that, regardless of what the current state of the app is, we can always reset the state and perform a deep linking action starting afresh. This drastically simplifies the graph, avoiding unnecessary transitions such as the one shown in the next picture.
Notice that intents (NavigationIntent) are different from transitions (NavigationEngine.StateMachine.EventType). An intent contains the information to perform a deep linking journey, while the event type is the transition from one FSM state to another (or the same).
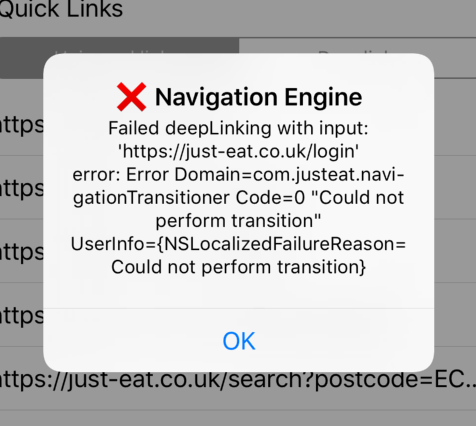
NavigationTransitioner is the class that performs the transitions and applies the companion navigation changes. A navigation step is performed only if the corresponding transition is allowed and completed successfully. If a transition is not allowed, the flow is interrupted, reporting an error in the future. You can showcase a failure in the demo app by trying to follow the Login Universal Link (https://just-eat.co.uk/login) after having faked the login when following the Order History Universal Link(https://just-eat.co.uk/orders).
Usage
NavigationEngineDemo includes the whole stack that readers can use in client projects. Here are the steps for a generic integration of the code.
- Add the NavigationEngine stack (
NavigationEngineDemo/NavigationEnginefolder) to the client project. This can be done by either creating a dedicated pod as we do at Just Eat or by directly including the code. - Include
PromisandStatefulas dependencies in your Podfile (assuming the usage of Cocoapods). - Modify according to your needs, implement classes for all the
*FlowControllerProtocols, and connect them to the ViewControllersof the client. This step can be quite tedious depending on the status of your app and we suggest trying to mimic what has been done in the demo app. - Add
CFBundleTypeRoleandCFBundleURLSchemesto the main targetInfo.plistfile to support Deep Links. E.g.
CFBundleURLTypes


    CFBundleTypeRole
    Editor
    CFBundleURLSchemes

      je-internal
      justeat
      just-eat
      just-eat-uk
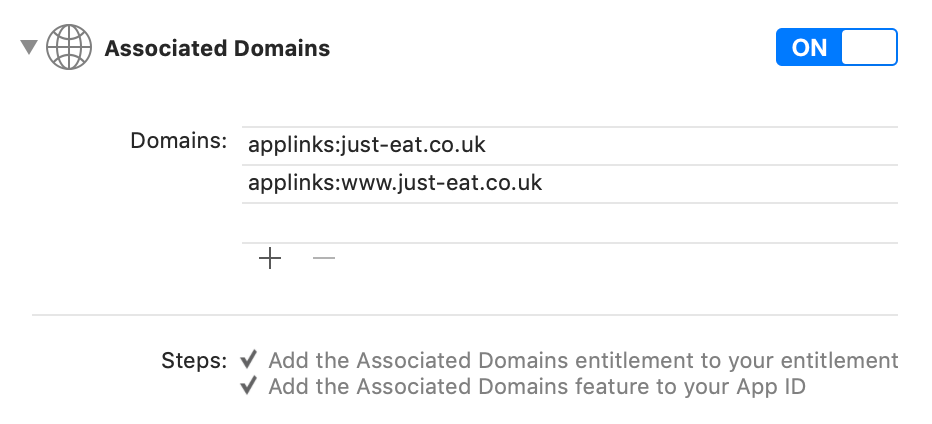
- Add the applinks (in the Capabilities -> Associated Domains section of the main target) you’d like to support. This will allow iOS to register the app for Universal Links on the given domains looking for the
apple-app-site-associationfile at the root of those domains once the app is installed. E.g.
- Implement concrete classes for
DeepLinkingSettingsProtocolandUserStatusProvidingaccording to your needs. Again, see the examples in the demo project. TheinternalDeepLinkSchemesproperty inDeepLinkSettingsProtocolshould contain the same values previously added toCFBundleURLSchemes, while theuniversalLinkHostsshould contain the sameapplinks:values defined in Capabilities -> Associated Domains. - Setup the
NavigationEnginestack in the AppDelegate’sapplicationDidFinishLaunching. To some degree, it should be something similar to the following:
var window: UIWindow?
var rootFlowController: RootFlowController!
var deepLinkingFacade: DeepLinkingFacade!
var userStatusProvider = UserStatusProvider()
let deepLinkingSettings = DeepLinkingSettings()
func applicationDidFinishLaunching(_ application: UIApplication) {
  // Init UI Stack
  let window = UIWindow(frame: UIScreen.main.bounds)
  let tabBarController = TabBarController.instantiate()
  // Root Flow Controller
  rootFlowController = RootFlowController(with: tabBarController)
  tabBarController.flowController = rootFlowController
  // Deep Linking core
  let flowControllerProvider = FlowControllerProvider(rootFlowController: rootFlowController)
  deepLinkingFacade = DeepLinkingFacade(flowControllerProvider: flowControllerProvider,
                                        navigationTransitionerDataSource: self,
                                        settings: deepLinkingSettings,
                                        userStatusProvider: userStatusProvider)
  // Complete UI Stack
  window.rootViewController = tabBarController
  window.makeKeyAndVisible()
  self.window = window
}- Modify
NavigationTransitionerDataSourceaccording to your needs and implement its methods. You might want to have a separate component and not using the AppDelegate.
extension AppDelegate: NavigationTransitionerDataSource {
  func navigationTransitionerDidRequestUserToLogin() -> Future {
    <#async logic#>
  }
  ...
} - Implement the entry points for handling incoming URLs/inputs in the AppDelegate:
func application(_ app: UIApplication, open url: URL, options: [UIApplication.OpenURLOptionsKey : Any] = [:]) -> Bool {
  // from internal deep links & TodayExtension
  deepLinkingFacade.openDeeplink(url).finally { future in
    <#...#>
  }
  return true
}
func application(_ application: UIApplication, continue userActivity: NSUserActivity, restorationHandler: @escaping ([UIUserActivityRestoring]?) -> Void) -> Bool {
  switch userActivity.activityType {
  // from Safari
  case NSUserActivityTypeBrowsingWeb:
    if let webpageURL = userActivity.webpageURL {
      self.deepLinkingFacade.handleURL(webpageURL).finally { future in
        <#...#>
      }
      return true
    }
    return false
  // from Spotlight
  case CSSearchableItemActionType:
    self.deepLinkingFacade.openSpotlightItem(userActivity).finally { future in
      let originalInput = userActivity.userInfo![CSSearchableItemActivityIdentifier] as! String
        <#...#>
      }
    return true
  default:
    return false
  }
}
func application(_ application: UIApplication, performActionFor shortcutItem: UIApplicationShortcutItem, completionHandler: @escaping (Bool) -> Void) {
  // from shortcut items (Home Screen Quick Actions)
  deepLinkingFacade.openShortcutItem(shortcutItem).finally { future in
    let originalInput = shortcutItem.type
    <#...#>
    completionHandler(future.hasResult())
  }
}
N.B. Since a number of tasks are usually performed at startup (both from cold and warm starts), it’s suggested to schedule them using operation queues. The deep linking task should be one of the last tasks in the queue to make sure that dependencies are previously set up. Here is the great Advanced NSOperations talk by Dave DeLong from WWDC15.
- The
UniversalLinkConverterclass should be modified to match the paths in theapple-app-site-association, which should be reachable at the root of the website (the associated domain). It should be noted that if the app is opened instead of the browser, it would be because the Universal Link can be handled; and redirecting the user back to the web would be a fundamental mistake that should be solved by correctly defining the supported paths in theapple-app-site-associationfile.
To perform internal app navigation via deep linking, the DeeplinkFactory class should be used to create DeepLink objects that can be fed into either handleURL(_ url: URL) or openDeepLink(_ deepLink: DeepLink).
In-app testing
The module exposes a DeepLinkingTesterViewController that can be used to easily test deep linking within an app.
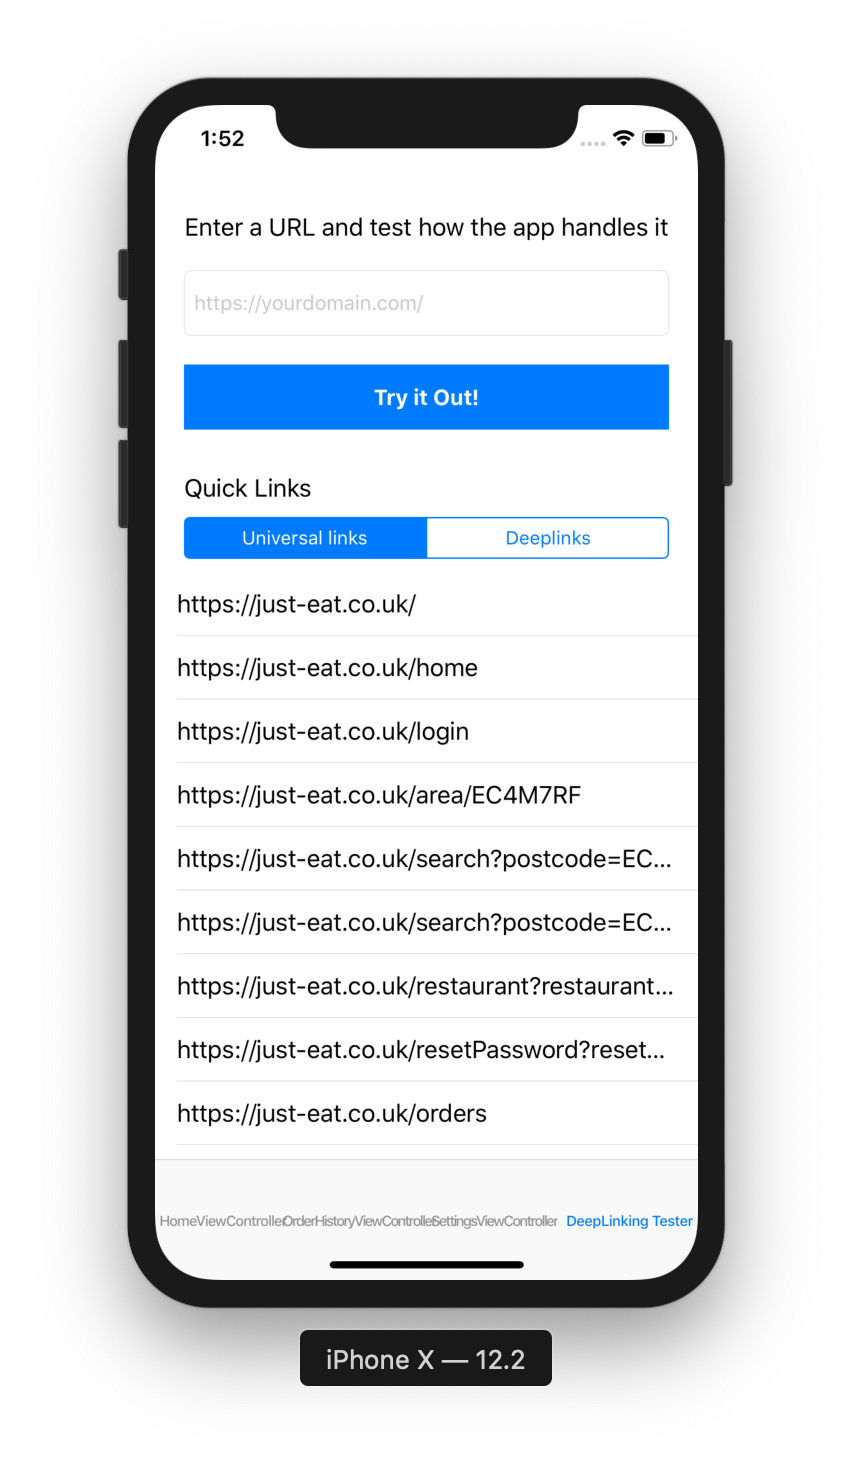
Simply define a JSON file containing the Universal Links and Deep Links to test:
{
  "universal_links": [
    "https://just-eat.co.uk/",
    "https://just-eat.co.uk/home",
    "https://just-eat.co.uk/login",
    ...
  ],
  "deep_links": [
    "JUSTEAT://irrelev.ant/home",
    "justeat://irrelev.ant/login",
    "just-eat://irrelev.ant/resetPassword?resetToken=xyz",
    ...
  ]
}
Then feed it to the view controller as shown below. Alternatively, use a storyboard reference as shown in the demo app.
let deepLinkingTesterViewController = DeepLinkingTesterViewController.instantiate()
deepLinkingTesterViewController.delegate = self
let path = Bundle.main.path(forResource: "deeplinking_test_list", ofType: "json")!
deepLinkingTesterViewController.loadTestLinks(atPath: path)and implement the DeepLinkingTesterViewControllerDelegate
extension AppDelegate: DeepLinkingTesterViewControllerDelegate {
    func deepLinkingTesterViewController(_ deepLinkingTesterViewController: DeepLinkingTesterViewController, didSelect url: URL) {
        self.deepLinkingFacade.handleURL(universalLink).finally { future in
            self.handleFuture(future, originalInput: universalLink.absoluteString)
        }
    }
}
Conclusion
The solution proposed in this article has proven to be highly scalable and customizable. We shipped it in the Just Eat iOS apps in March 2019 and our teams are gradually increasing the number of Universal Links supported as you can see from our apple-app-site-association.
Before implementing and adopting NavigationEngine, supporting new kinds of links was a real hassle. Thanks to this architecture, it is now easy for each team in the company to support new deep link journeys. The declarative approach in defining the API, states, transitions, and intents forces a single way to extend the code which enables a coherent approach throughout the codebase.
whoah this weblog is excellent i really like studying your posts.
Stay up the great work! You know, a lot of individuals
are searching around for this information, you
can aid them greatly.
Comments are closed.