Personalised marketing has evolved quickly in recent years and customising digital communications based on customer behaviour has become commonplace. With the widespread consumer adoption of mobile devices and social media, the number of channels across which marketing operations must be carried out has only increased – meaning data plays a crucial role in creating tailored, cross-channel customer interactions. Fortunately, a number of marketing management CRM solutions are available to greatly streamline this process. At JUST EAT, we have chosen Salesforce Marketing Cloud.
Marketing Cloud offers a comprehensive suite of services, including data and analytics, email editing, management of social media advertising, interactive website creation, and cross-channel marketing automation. We currently only use a subset of Marketing Cloud’s functionality but it is already proving to be a powerful enabling platform for the marketing team – helping them to build automated campaigns without the need to write code. However, we have found that there are many business requirements that still can not be fulfilled by the vanilla Marketing Cloud product. Fortunately, we can customise the experience and provide the marketing team with even more automation tools.
A (very) brief Marketing Cloud 101
We needed to make unique voucher codes available to campaigns from our main e-commerce platform. A worked example will best illustrate the problem we encountered when introducing this custom behaviour.
We have built a Windows service that sits inside our Virtual Private Cloud (VPC) in AWS and subscribes to a number of important messages published to our internal message bus. In turn, these messages are mapped to a structure that enables each one to be sent in a POST request to Marketing Cloud’s REST API – the information will be written to a new row in a Marketing Cloud Data Extension. Just think of Data Extensions as tables in a relational database. The following image shows a simple Data Extension with some test customer entries pushed to Marketing Cloud by our service.
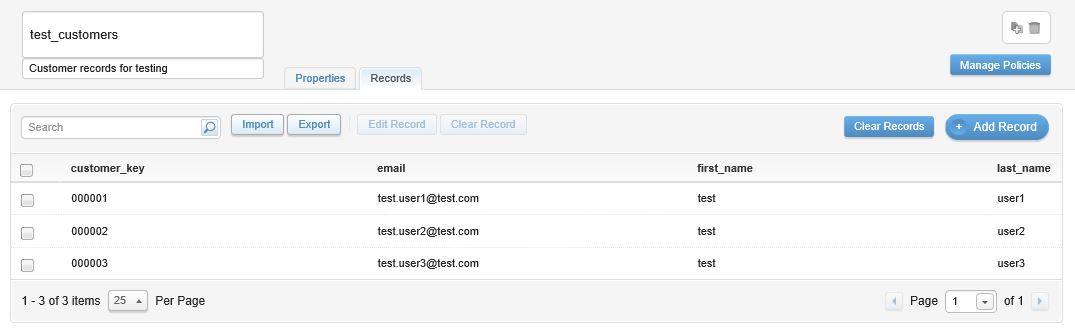
Marketing Cloud uses a contact model to provide a single view of a customer’s information across Data Extensions, so let’s assume that this Data Extension is correctly set up with our contact model, otherwise we couldn’t be able use this data in our Marketing Cloud campaigns.
The first step to building a campaign will be to build a simple automation in Marketing Cloud’s Automation Studio. Automations can be used for a number of purposes but we’ve found them particularly useful for running a series of activities to firstly query the data in our Data Extensions, in order to establish an audience for a campaign based on some criteria, and then trigger the running of the campaign for this audience. For example, we may want to run a campaign that sends out vouchers to an audience which only contains customers who haven’t recently placed an order. The image shows a simple automation with just two activities – a query and a trigger.
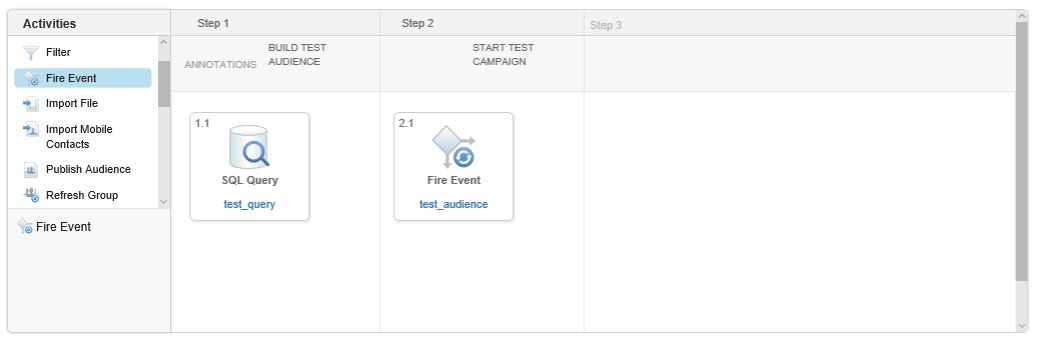
The query activity will write the audience to another Data Extension which we define and the trigger will fire an event which will run our campaign for any contacts written to this Data Extension.
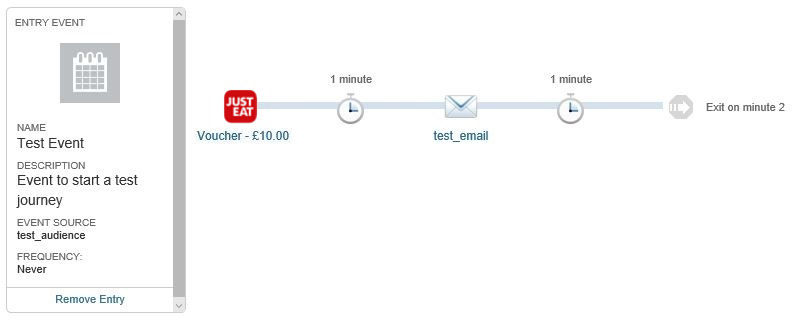
The campaign will be defined as a customer journey in Marketing Cloud. We can use Marketing Cloud’s Journey Builder to drag and drop the different activities that make up a customer journey from a palette onto a canvas. Example activities include sending an email or SMS, updating rows in Data Extensions, waiting for a period of time, or making decisions to send our contacts on different paths through the journey. We can define a simple journey that just sends an email. Note that Journey Builder also requires a wait activity before a contact exits a journey.
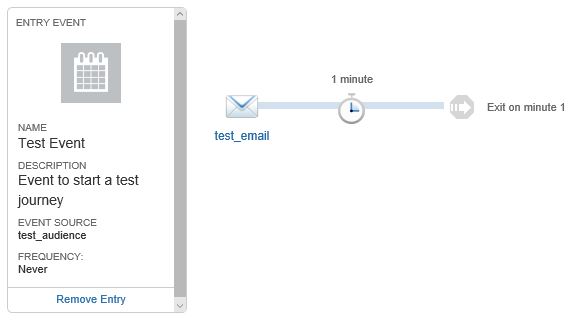
Our entry event shows the event data source as our Data Extension that contains our audience. Each contact in this Data Extension will pass through this journey and should eventually receive an email based on a template that we define for the email activity.
Now we want to add an additional activity before sending the email that requests a voucher from our internal Voucher API to include in the email. This is the exact problem that we encountered in our recent work and, by default, there’s no way to do that from a customer journey. However, we can create a custom activity that will be available from the activity palette and allow us to do just that.
Building custom behaviour
A custom activity is simply a web application that is hosted on a web server. The structure that these applications must follow in order to be used as Journey Builder activities is well defined but there is still a great deal of flexibility with regards to the technology chosen to build the application. All of the basic examples provided by Salesforce are built using the Express web framework for Node.js so we decided to do the same as it seemed the path of least resistance. However, knowing what we know now, we could have just as easily built it using other web frameworks or technologies.
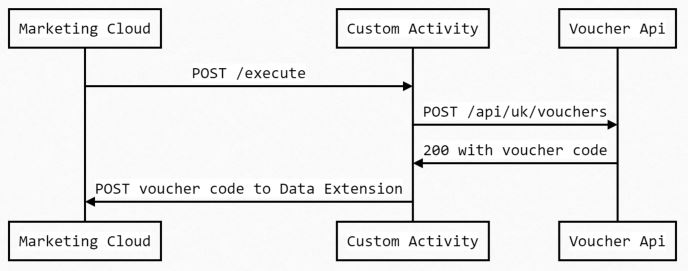
When a contact reaches our custom activity in a customer journey we want the following chain of events to occur…
- A voucher request is made from the journey to our web application back-end and the contact moves to a wait activity in the journey.
- The web application makes a request to our internal Voucher API and receives a voucher code in the response.
- The web application sends the voucher code to the Marketing Cloud REST API so that it can be written to a column in our campaign audience Data Extension against the contact record.
- The contact moves to the email activity in the journey where some server-side JavaScript inside the email template fetches the voucher code for that contact from the Data Extension and writes it to the email.
We need to write the voucher codes to a Data Extension in order to make them accessible to a Marketing Cloud email template.
The back-end for the web application is a fairly standard Express REST API that includes a number of endpoints required by Journey Builder. During a running journey, the voucher request is sent to an endpoint in order to execute the functionality required to complete steps two and three, listed previously. There are a few other endpoints that are only required by Journey Builder when the journey is being edited.
During the editing process, both Standard and custom activities in Journey Builder have a configuration wizard that displays in an HTML iframe in order to configure the activity after it is placed on the canvas. For example, for our voucher custom activity it makes sense for us to be able define voucher amount, validity period and other related parameters for that particular campaign. We also need to choose the Data Extension and column to which the voucher codes will be written. This wizard is provided by the front-end code of our web application.
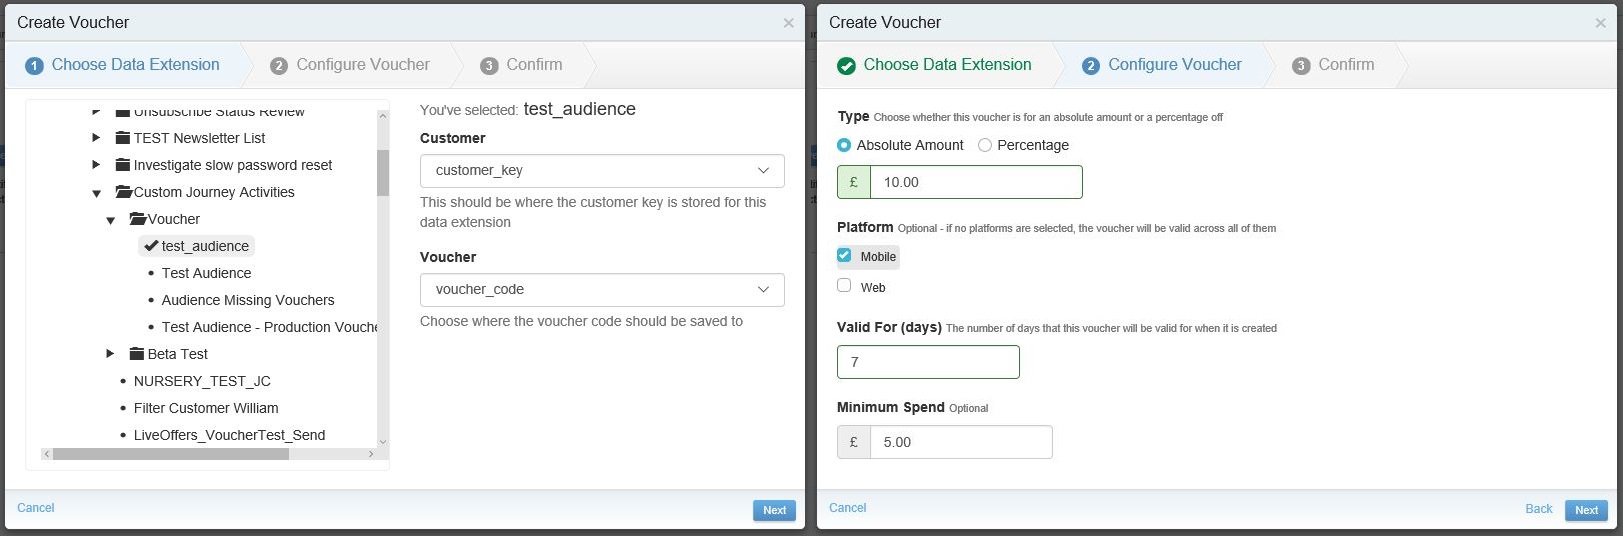
Salesforce even provides FuelUX, a front-end framework which extends Bootstrap and provides some additional JavaScript controls. This enabled us to match the look and feel of the Marketing Cloud UI and include a picker for choosing the Data Extension and column for the voucher codes.
There are a couple of requirements for the front-end code to function correctly in Journey Builder. Firstly, Postmonger must be used in our code. It is a lightweight JavaScript utility for cross-domain messaging and is required as a mediator between our configuration wizard and Journey Builder. Secondly, the root of the front-end code must include a configuration file that contains, amongst other things, the URLs for our back-end endpoints, the inputs and outputs of the custom activity, and a unique application key.
We define the unique application key when we create a new application in the Salesforce App Center as an Application Extension and add our custom activity to this. We also need to provide the endpoint of our custom activity at this point. This step is required for connecting applications to the Marketing Cloud platform and will provide us with a generated Client ID and Client Secret to authenticate with Marketing Cloud and allow our custom activity to interact with the Marketing Cloud API.
Salesforce recommend to use Heroku for hosting custom activities. Heroku is a great option for this type of lightweight Node.js application but wasn’t ideal for us as we needed to interact with our Voucher API which sits inside our VPC. As a result, our custom activity is also hosted inside our VPC so communication with any internal resources is not an issue. This means that we only have to manage the security between our custom activity and Marketing Cloud without publicly exposing the endpoint to our Voucher API. Hosting within the VPC also allows us to take advantage of our internal stacks setup for logging and recording stats.
Following these steps we are now able to drag and drop our custom activity from the activity palette onto the canvas for use in the customer journey.
Conclusion
Not only did we deliver a critical component that will be used across a number of our marketing campaigns, but we also opened up the possibilities of what can be done within the confines of a customer journey. Marketing Cloud offers some great automation tools for marketers but pairing it with the flexibility of our own platform in AWS should open up some interesting opportunities for coordination between the two. We will surely be exploring what other custom activities we can add to the marketing team’s toolset in order to further enable them to react quickly without the need to make amendments to our codebase.